
How to Balance HVAC Registers in Your Twin Cities Home
Key Takeaways
- “Balancing registers” means adjusting three physically different hardware points. Only the in-duct butterfly damper, near the supply plenum, gives you real control over airflow volume.
- Start with a full reset: open every register and damper to 100%, run the system for 24 hours, then measure every room before touching anything.
- Never close a damper more than 80-85%. Beyond that point, backpressure builds, conditioned air escapes through duct seams into unconditioned spaces, and equipment damage follows.
- The seasonal flip matters more here than in most of the country. Open upper-floor runs more in summer; open lower-floor runs more in winter.
- Some rooms cannot be balanced from the supply side alone. A room with no return air path and a closed door will stall regardless of how you adjust the supply register.
- If a full reset and two rounds of adjustments do not bring rooms to setpoint, the issue is likely duct leakage or equipment sizing. Both require a professional diagnostic, not more DIY.
What Does “Balancing HVAC Registers” Actually Mean?
Balancing registers means adjusting airflow through each duct branch so every room reaches your thermostat setpoint at roughly the same time, without starving any zone of conditioned air.
Most guides frame this as “close the hot rooms a little.” That framing is imprecise in a way that leads to equipment damage and service calls. Here is the accurate version.
Your forced-air system has one air handler, one supply plenum, and multiple duct branches running to registers throughout the house. The branches closest to the plenum carry more pressure than the branches at the far end. That is physics: the longer the duct run, the more friction loss along the way.
In practice, rooms at the end of long branches often run cold in winter and warm in summer. Shorter branches near the plenum tend to overshoot setpoint by several degrees. Balancing means slightly restricting those high-flow short runs so more pressure reaches the starved branches at the back of the system.
Done right, it produces noticeable improvement. Done wrong, or done with the wrong hardware, it creates backpressure that damages your equipment and wastes energy.
The stakes are higher here than in most cities. At Minnesota design temperatures of -16°F to -20°F, a room running 4°F below setpoint is not just uncomfortable. For elderly residents or young children, that gap is a health issue in January. Getting the system balanced before hard winter sets in is not optional maintenance here - it is preparation.
What Are the Three Register Controls - and Which One Actually Works?
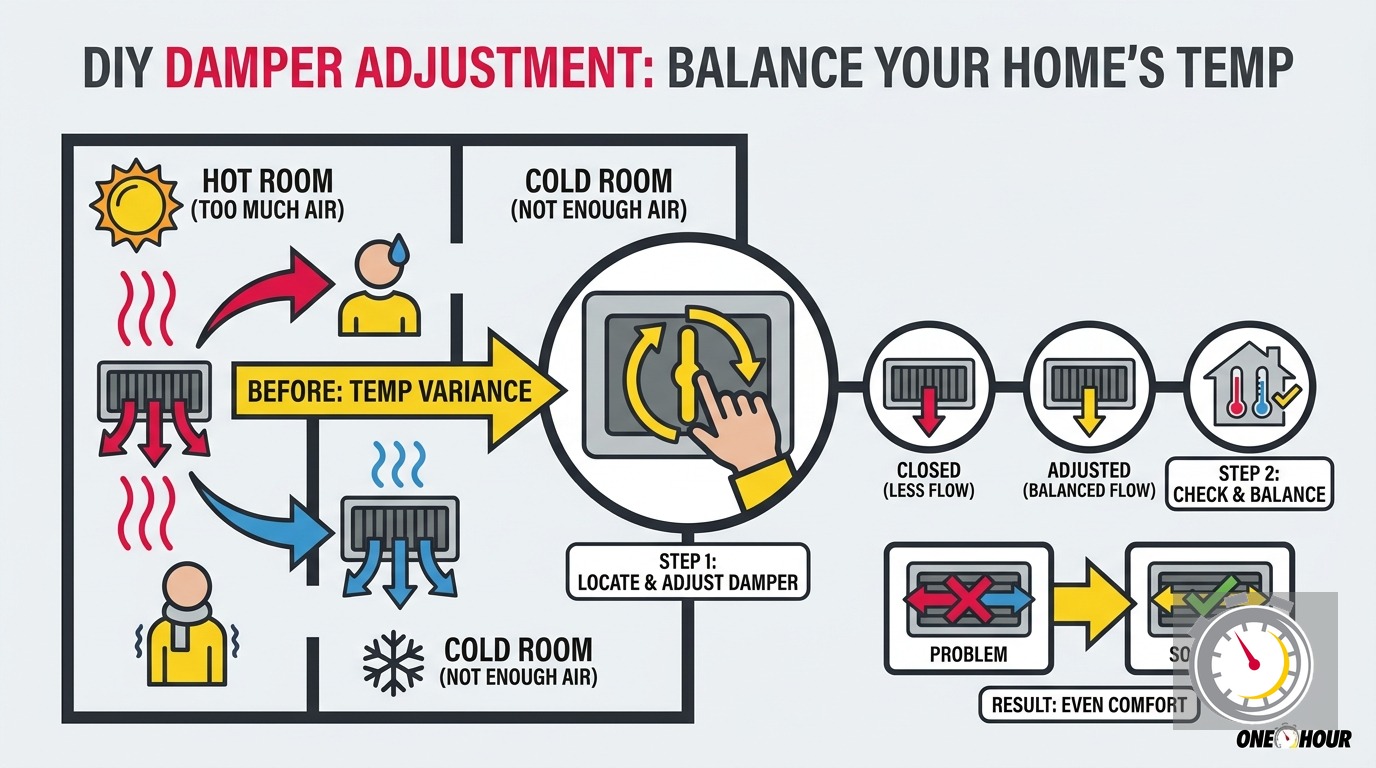
There are three physically different hardware points that homeowners call “the register control.” Only one of them gives you real volume control. The short answer: the louver blades redirect air direction; the register box damper coarsely reduces it; only the in-duct butterfly damper controls airflow at the source.
The louver blades. The angled slats on the register face. Closing them redirects air toward a corner or wall. They do not meaningfully reduce flow volume. If your fix for a warm room is closing the louvers all the way, you are pointing hot air at a wall. Nothing more.
The register box damper. A small lever or slide built into the register housing, accessible when you remove the face plate. It does partially restrict flow, but it sits at the very end of the duct run, where the supply pressure has already distributed across the branch. It is also the easiest control to over-close. Most levers have no tactile stops between “half open” and “completely shut,” so there is no feedback telling you how far you have gone.
The in-duct butterfly damper. This is the correct control point. It sits inside the duct run itself, within a foot or two of where the branch leaves the supply plenum. Look for it in your mechanical room, basement ceiling, or crawl space. It is a round plate on a pivot rod. The lever runs parallel to the duct when fully open. It runs perpendicular when fully closed. Adjusting it controls pressure across the entire branch at the source.
The Department of Energy puts it plainly: “With any duct runout, balancing dampers are needed to adjust the pressure of airflow through the outlets because self-balancing systems are not realistic.”
Not every Twin Cities home has in-duct dampers. Homes built before 1980 may have supply runs with no butterfly damper at all. In that case you are limited to the register box damper - which means keeping every adjustment small and conservative.
What Should You Do Before Adjusting Any Register?
Run a baseline reset first: open every register and damper to 100%, let the system run for 24 hours, then measure room temperatures before making any changes. Previous owners, past contractor work, or your own earlier experiments may have left dampers partially closed in ways that compound with what you are about to do. Start from a known state.
Baseline reset steps:
- Walk every supply register in the house. Remove each face plate and open the register box damper to the fully open position.
- Find the in-duct dampers on each supply branch. In most Twin Cities homes they are in the basement or mechanical room. Turn each lever parallel to the duct - that is fully open.
- Check all return registers for obstructions. Furniture pushed against a return grille, a rug covering a floor return, or storage bins blocking a return duct will distort your baseline and limit system performance.
- Set the thermostat to your normal target temperature. Do not adjust it during the test period.
- After 24 hours, walk every room with a thermometer. Write down how far each room deviates from setpoint - which rooms run warm, which run cold, and by how many degrees.
That list is your map. You will use it to measure progress after each round of adjustments, and to know when you have reached the limit of what register balancing can accomplish.
How to Balance HVAC Registers Twin Cities Homes: Step-by-Step
With your 24-hour baseline in hand, here is the adjustment procedure.
Label your in-duct dampers.
In the basement or mechanical room, trace each supply branch from the plenum. Stick a piece of masking tape on each damper handle and write the room it serves. You will be making one-notch changes over multiple cycles. Know which handle is which.
Adjust one notch at a time.
A butterfly damper moves in roughly 15-degree increments. One notch is about 15 degrees from the current position. That is the right unit of change for a first pass. Close the runs serving rooms that are overperforming: rooms that run warm in winter, or cool in summer. Leave underperforming runs fully open.
Wait between adjustments.
After each one-notch change, let the system run for 2-4 hours before measuring again. Forced-air systems take time to redistribute pressure and stabilize room temperatures. Change one run per cycle so you know exactly which adjustment produced which result.
Hold the 80-85% limit.
Never close a manual damper more than 80-85% of the way. Past that point, backpressure builds inside the duct. Conditioned air finds the path of least resistance: duct seams and poorly sealed register boots. It escapes into unconditioned spaces instead of your living area. A typical home already loses 20-30% of conditioned air through duct leaks before it reaches the register. Closing dampers past the limit makes that worse.
Work from the far runs first.
The supply branches furthest from the air handler are the ones most starved for pressure. Before closing anything, confirm those long-run dampers are fully open. Then close the shorter, higher-pressure runs one notch to redirect pressure toward the back of the system.
If your home has no in-duct dampers: Use the same one-notch principle with the register box damper. Treat each small click of the lever as your unit of change. Never close a register box damper past halfway. Control is less precise, so the risk of overshooting is higher.
Should I Adjust Registers Differently in Summer vs. Winter?
Yes - and in the Twin Cities, this seasonal flip matters more than in most U.S. cities. In summer, push more air upstairs. In winter, push more air to the lower floors. Heat rises in summer and loads upper floors harder. Cold settles in winter and underloads them. A one-notch seasonal adjustment on a few dampers in May and again in October handles most of the shift.
Twin Cities homeowners face roughly a 110°F swing between winter wind chills and summer highs. A home in a temperate climate can use one damper position year-round with minimal comfort loss. Here, the gap between heating and cooling loads is large enough that a fixed setting leaves noticeable deficits in one season or the other.
Summer settings: Open upper-floor supply runs more fully. Partially close basement and main-floor runs to push pressure upstairs.
Winter settings: Open lower-floor and basement supply runs more fully. Partially close upper-floor runs so the second floor does not overheat while the main level is still trying to reach setpoint.
Take a photo of your seasonal damper positions. Five minutes of labeling and photography now saves a full re-diagnosis every spring and fall. If upper floors still run cold after the seasonal flip, our post on why upstairs rooms run cold in winter covers the additional causes - insulation gaps, air sealing, and system sizing - that register adjustment alone cannot fix.
Why Won’t Some Rooms Balance No Matter What I Do?
If a room has no return air path and the door stays closed, supply air builds positive pressure inside until airflow stalls. No adjustment to the supply register will fix this. The problem is on the return side, not the supply side.
Most Twin Cities homes built before 1990 use a central return: one large grille in a hallway or open living area serving the entire house. That design works with interior doors open. With doors closed - a bedroom overnight, a home office during the workday - the room becomes pressurized. Supply air cannot enter because it has nowhere to go.
ENERGY STAR requires new certified homes to hold a pressure differential of -3 Pa to +3 Pa between bedrooms and the main body of the house with all air handlers running. That is the professional benchmark for “balanced.” Most older homes miss it by a wide margin.
The DOE Building Science Education Center identifies three code-compliant solutions: dedicated per-room returns, transfer grilles above interior doors, and jump ducts. For an existing home, an over-door transfer grille is the most accessible retrofit. It is a louvered panel cut through the wall above an interior door. It allows air to circulate from the room back toward the central return.
How to diagnose it: Hold a tissue near the bottom gap of a closed bedroom door while the system runs. If the tissue is pulled toward the door, that room has positive pressure and a return air problem. See our post on return air problems and HVAC airflow in Twin Cities homes for the full diagnostic and retrofit options.
What Happens When You Over-Close Registers?
Over-closing does not just reduce comfort in one room. It creates backpressure that damages equipment at both ends of the heating and cooling cycle. These are the three failure modes the generic guides skip - and the ones that turn a DIY adjustment project into a service call.
Frozen evaporator coil (summer).
When too many supply runs are restricted, airflow across the evaporator coil drops below its design minimum. The refrigerant absorbs less heat from the passing air. Coil temperature falls below 32°F, condensation freezes on the surface, and ice accumulates. Airflow drops further as the ice block grows, and the system stops cooling entirely.
Thawing a frozen coil takes up to 24 hours. If the restriction stays, the coil freezes again on the next cycle. Over time, liquid refrigerant makes it back to the compressor - a far more expensive failure. Our post on why your AC ices up covers the diagnostic if you see ice on the outdoor unit or along the refrigerant line.
Furnace limit switch trips (winter).
The heat exchanger needs adequate airflow to stay within its safe operating temperature range. Restrict airflow enough and the blower cannot carry heat away. The high-limit safety switch trips and shuts the burner off. At Minnesota design temperatures of -16°F to -20°F, a furnace that keeps cycling off is not an inconvenience. It is a serious problem.
Repeated limit trips stress the heat exchanger over time. Eventually it cracks. A cracked heat exchanger is a carbon monoxide risk and typically costs more to repair than furnace replacement.
Conditioned air loss into unconditioned spaces.
Over-closing does not eliminate the air your system produces. It raises duct pressure until that air finds another exit - through seams, joints, and poorly sealed register boots into the attic, crawlspace, or wall cavities. You pay to heat or cool spaces you do not occupy, on top of the 20-30% that is already escaping through existing duct leaks.
When Should You Call a Professional Instead?
Stop adjusting and call a tech when two full cycles have not moved room temperatures, when you see ice on the AC system, when the furnace is short-cycling, or when energy bills spike without a weather explanation. Those symptoms point to duct leakage or equipment sizing - problems that register adjustment cannot solve.
Specific triggers to pick up the phone:
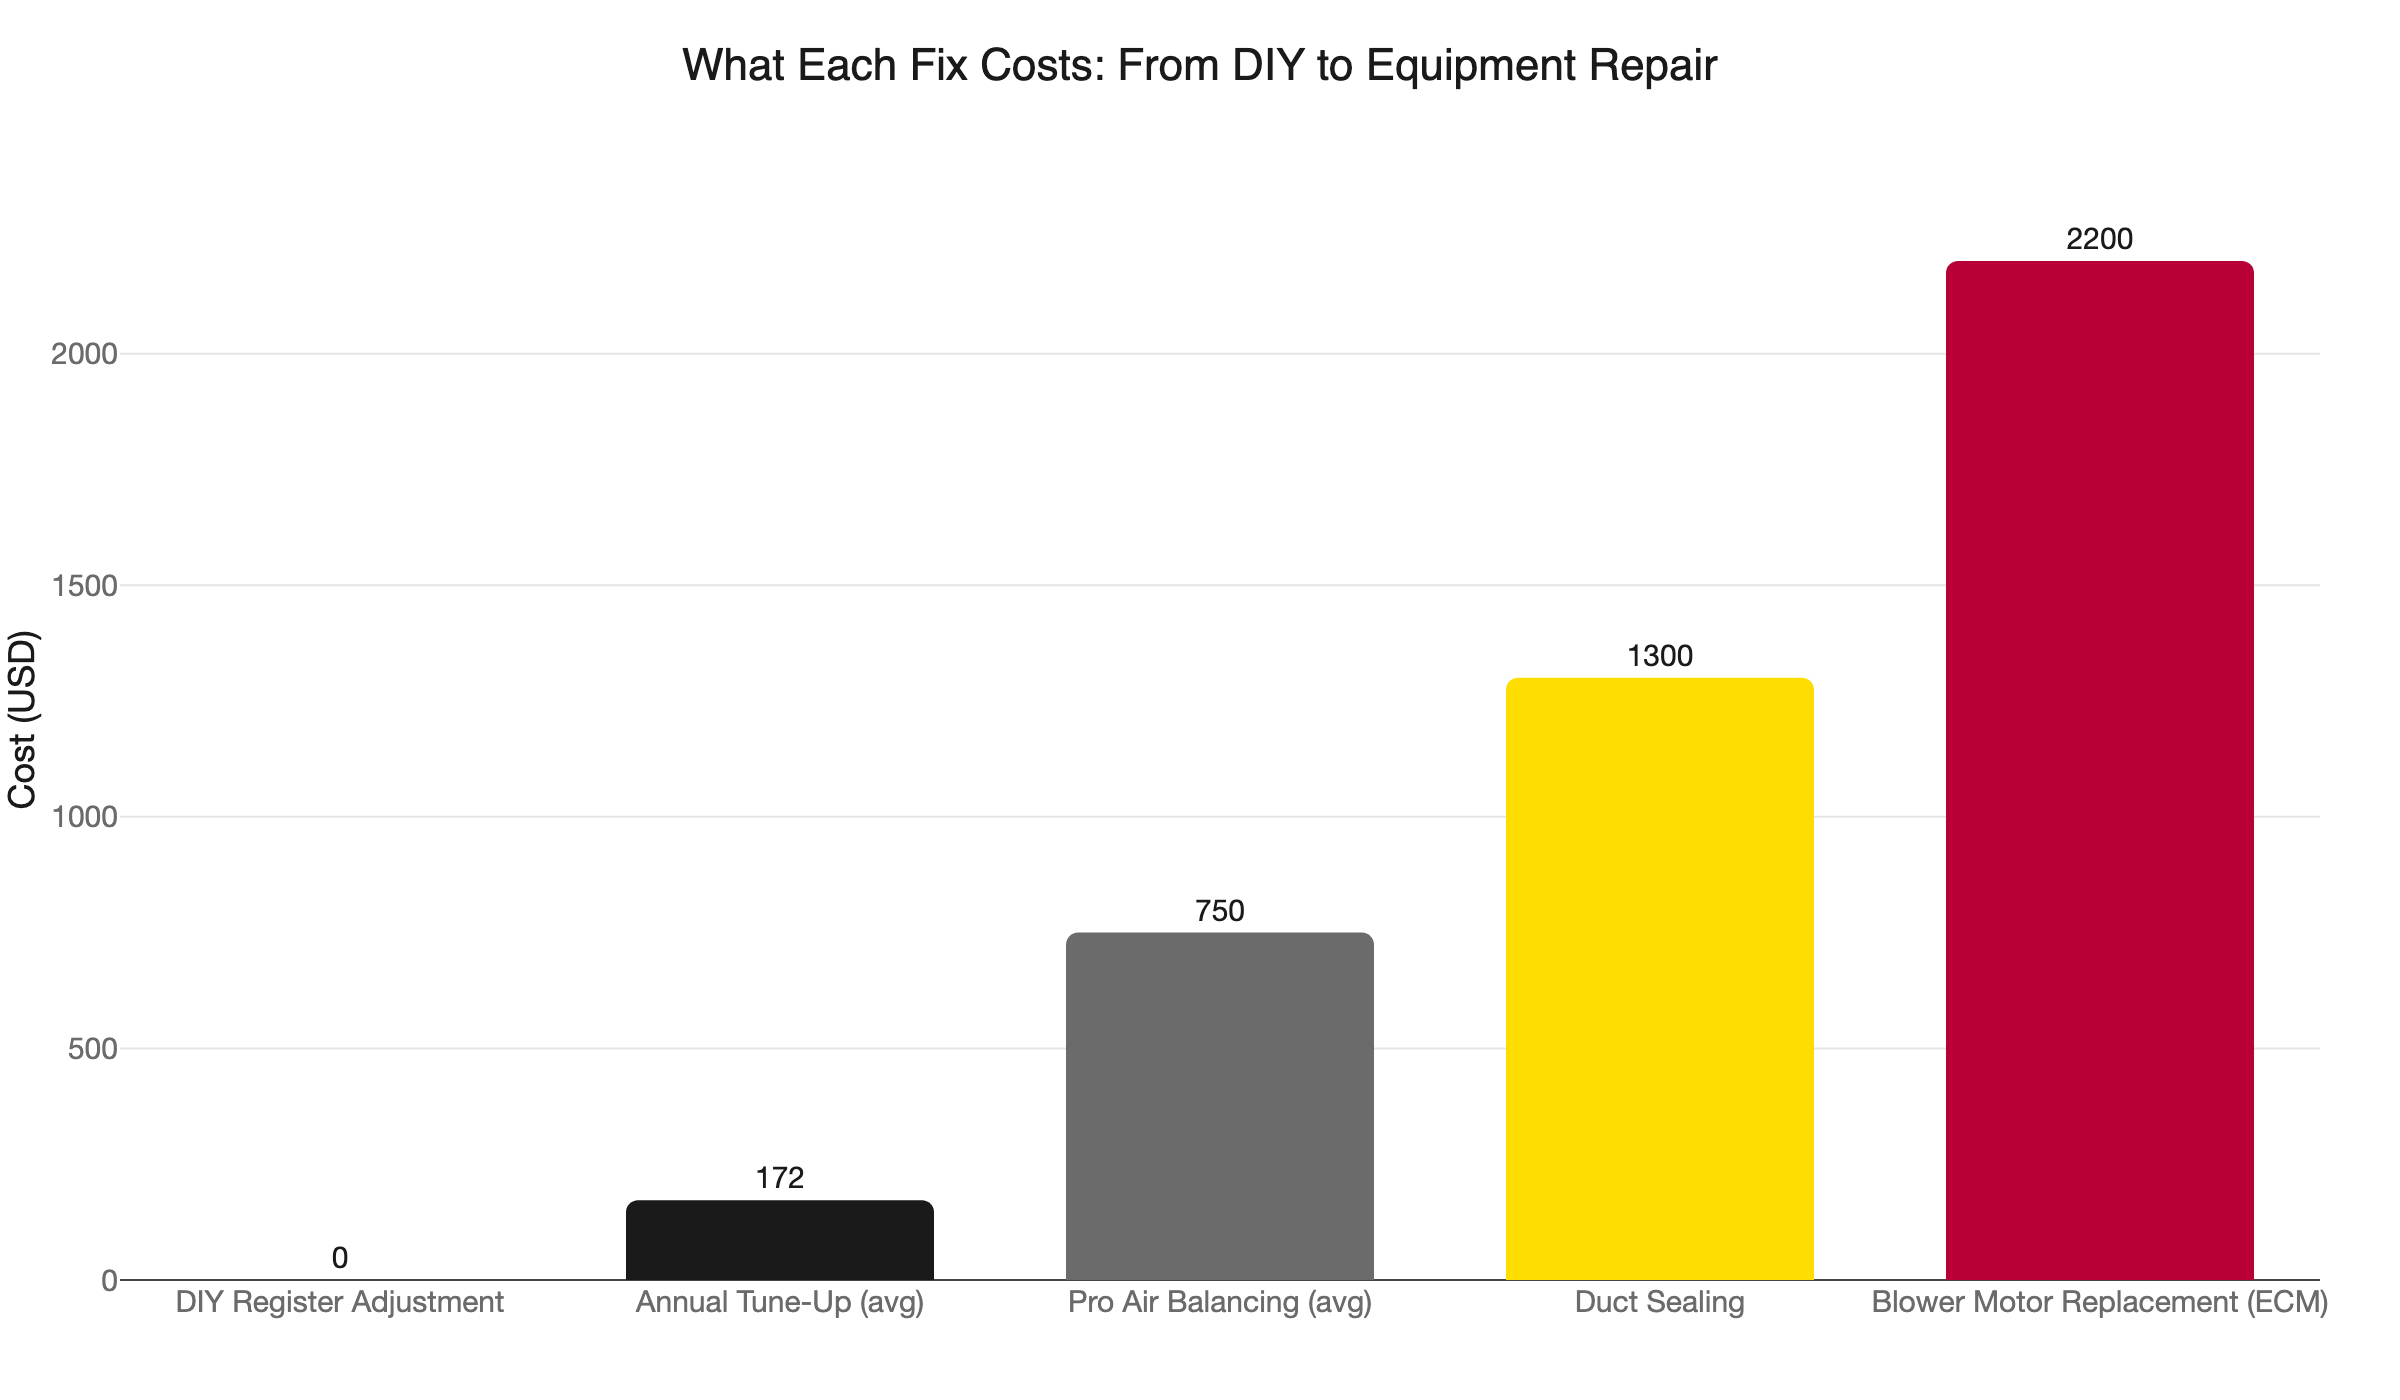
- Two full adjustment cycles with no measurable improvement. Root cause is likely duct leakage or a sizing mismatch. Both require diagnostic tools - blower door, manometer, flow hood - that most homeowners do not have. Professional air balancing runs $300-$1,200 depending on home size and complexity. It is the definitive answer when DIY stops working.
- Ice on the AC unit or evaporator coil. Open every damper to 100% immediately, power the system off, and call before restarting.
- Furnace short-cycling or the limit switch tripping. Open all dampers and call. Continuing to run the system with restricted dampers accelerates heat exchanger wear.
- Furnace cannot reach setpoint during a cold snap. A sizing mismatch invisible at 20°F shows up fast at -10°F. Our post on furnaces that can’t reach setpoint in extreme cold walks through the diagnostic steps.
- Energy bills spiking without a weather cause. That pattern usually points to duct leakage. Duct sealing runs around $1,300 and typically cuts conditioned-air loss significantly.
If a diagnostic visit points to an aging or undersized system, we can walk you through replacement options and available utility rebates. CenterPoint Energy gas customers qualify for up to $400 on a 97%+ AFUE furnace. Xcel Energy customers upgrading to a cold-climate heat pump can qualify for $400-$800 in rebates. Financing is available to spread the cost of a larger replacement.
Northern One Hour is locally owned and operated in Ramsey. Our team serves Minneapolis, St. Paul, Maple Grove, Blaine, Brooklyn Park, Plymouth, Woodbury, Bloomington, and the surrounding Twin Cities area. Call (763) 260-6662 or book online to schedule a diagnostic visit. We show up when we say we will - “Always On Time… Or You Don’t Pay a Dime!(R).”
Frequently Asked Questions
How do I know if my HVAC registers need balancing? +
Is it safe to fully close HVAC registers in unused rooms? +
What is an in-duct damper and where do I find it? +
How much does professional air balancing cost in the Twin Cities? +
Need a technician now?