
Why Heat Pump Vibration Noise Travels Through Your House
Key Takeaways
- Heat pump vibration noise through the house travels via three paths: the unit body, the refrigerant lineset, and the electrical conduit.
- Pads alone rarely solve the problem when the lineset is rigid. All three paths need isolation.
- Wall-mounted outdoor units cause the vast majority of vibration complaints. Ground mounting with a deliberate lineset loop is the superior fix.
- Adding soft isolators under a ground-mounted unit with a rigid lineset can make noise worse, not better.
- Standard elastomeric mounts crack in Minnesota winters. Cold-rated materials and a fall inspection are non-negotiable here.
- Xcel Energy, the City of Minneapolis, and the federal 25C credit can stack to $5,000 or more on a qualifying install in the Twin Cities.
Why Does Heat Pump Vibration Noise Travel Through the House?
Your outdoor unit vibrates at operating speed. That is normal. The problem starts when the unit connects rigidly to your home’s framing. A wall bracket bolted into studs, a refrigerant lineset running straight through a wall, or a rigid electrical conduit clamped to both the unit and the structure - each one creates a direct path for vibration to reach your floors, walls, and ceilings.
The hum you hear is mechanical energy moving through wood and drywall. The source is not always the unit itself. Most of the time, it is the connection between the unit and the structure.
The Three Paths Vibration Takes Into Your Home
Most guides focus on the unit’s base. That is only one of three vibration paths. Closing one while leaving the others open rarely solves anything.
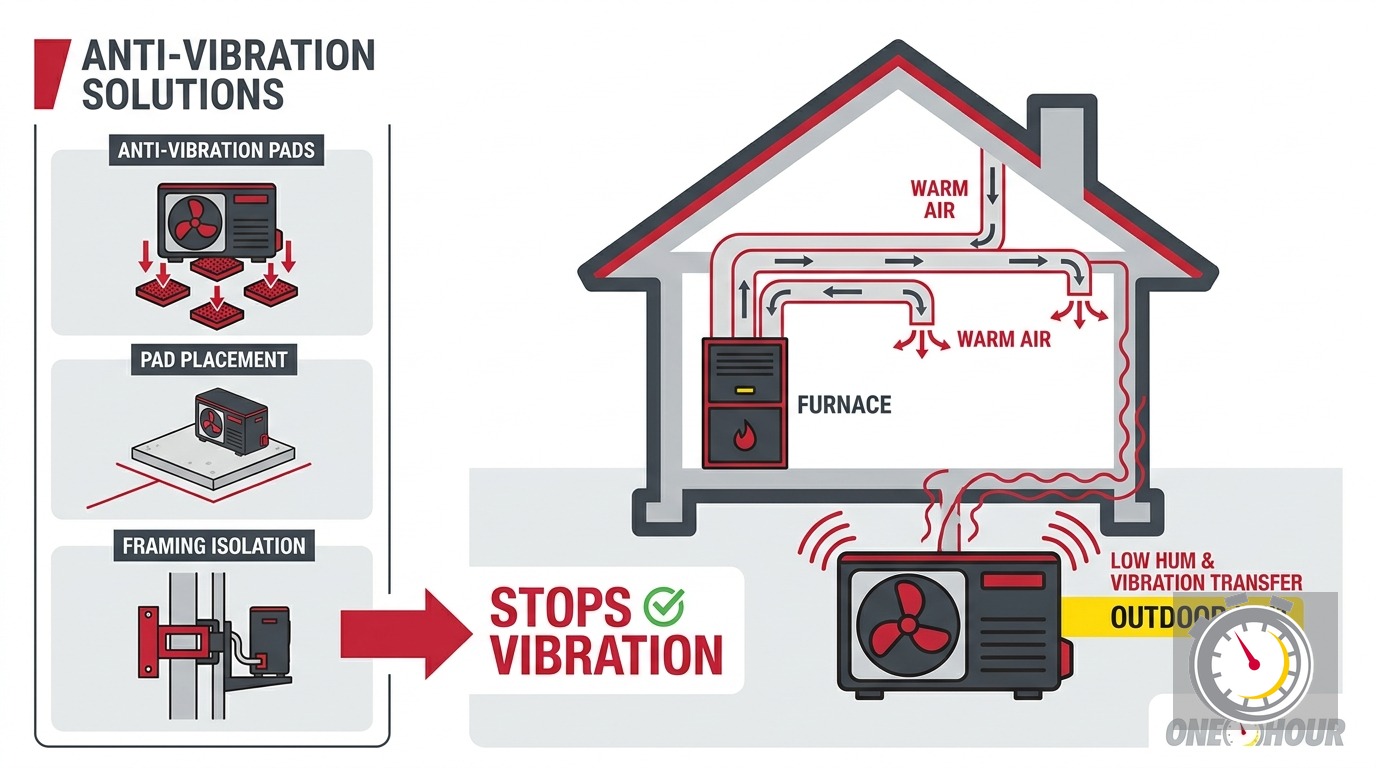
Path 1: The unit body. The compressor and fan motor create mechanical vibration. When the unit sits directly on a rigid surface - concrete, metal, or an asphalt pad without any isolation layer - that energy transfers into the structure with little resistance. This is the path that anti-vibration pads address.
Path 2: The refrigerant lineset. This is the path most guides skip entirely, and it is often the dominant source of persistent noise. The copper or aluminum lines connecting the outdoor unit to the indoor air handler pass through a hole in the wall. If those lines run rigid from the unit to the framing - no flex, no loop, just a straight shot - every compressor pulse travels down the line and into your studs like a drumstick hitting a frame. Lineset rattling against framing is a separate noise source from compressor vibration. The fix is a gentle bend in the lines and foam or mass-loaded vinyl isolation at the wall penetration.
Path 3: The electrical conduit. Wiring between the outdoor unit and the disconnect box often runs in rigid conduit. When that conduit is clamped firmly to both the unit and the wall, it creates a direct vibration bridge - the same mechanical problem as the lineset, just smaller in diameter.
Understanding all three paths matters because most persistent hum problems involve more than one of them. If you address only path 1 and the unit is wall-mounted, you have barely touched the problem.
Is a Wall-Mounted Outdoor Unit Causing Your Noise Problem?
The short answer: Almost certainly yes, if your unit is on a wall bracket. HVAC experts at Green Building Advisor identify wall-mounted outdoor units as the root cause in 99% of vibration-through-house complaints. Units should carry a warning not to mount onto stud walls.
A stud wall is essentially a large speaker cabinet. The framing members run continuously from the mount point to other rooms, floors, and ceilings. Mount a vibrating compressor to that structure and the energy has a highway into your living space.
Wall brackets made sense as a space-saving solution in tight lots or on properties where a pad would require grading work. The tradeoff is direct structural contact. Anti-vibration pads between the bracket and the wall reduce energy at that specific contact point. They do nothing for the lineset, which enters the structure a few inches away and often carries more vibration into the framing than the bracket itself.
If your outdoor unit is on a wall bracket and the hum is severe, the most effective fix is relocating the unit to a ground-mounted pad. That is a significant job. It is not a same-day band-aid. For a mild or moderate hum on a wall-mounted unit, a combination of improved lineset isolation, mount pads, and conduit decoupling can bring noise down to an acceptable level - but the wall-mount limitation is always working against you.
What Is the Lineset Loop, and Why Does It Matter?
The short answer: A lineset loop is a deliberate extra bend in the refrigerant lines before they enter the wall. That bend acts as a spring, absorbing compressor movement and breaking the rigid mechanical link between the unit and your framing. It is the most commonly missed detail in heat pump installations.
When a lineset runs from the outdoor unit directly into a wall penetration with no slack, it acts like a rigid rod. Every micro-movement at the compressor travels down that rod and into the structure. Add a loop - a graceful curve with extra line length before the wall - and those movements have somewhere to go other than your studs.
A good installer accounts for the loop at installation time. The extra line is inexpensive. The routing is planned before the first connection is made. Retrofitting a loop after the fact requires unstrapping the lineset, adding slack, reforming the route, re-insulating the lines, and re-sealing the wall penetration. It is doable on an existing installation. It is just easier and cheaper to get right on day one.
When discussing a new installation, ask specifically: “How will the lineset be routed at the wall penetration? Will there be a service loop?” A well-trained technician will know exactly what you mean and give you a clear answer. See our post on heat pump normal noises versus problem sounds for more on what to listen for once a unit is running.
Why Anti-Vibration Pads Alone Often Fall Short
Anti-vibration pads are the first recommendation in nearly every article on this topic - and they are not wrong, exactly. Rubber or elastomeric pads placed under all four corners of the unit, properly sized for unit weight and rated for outdoor UV and temperature exposure, measurably reduce energy transmission at the base.
The problem is that pads only address path 1. When a homeowner adds pads under a unit with a rigid lineset, path 2 continues carrying vibration directly into the framing. The hum continues. The pad gets the blame.
Pads work when they are part of a complete isolation system. That system requires:
- Properly rated pads under the unit feet, sized for the unit’s actual weight
- A loop in the lineset before the wall penetration
- Foam backer rod or mass-loaded vinyl at the penetration point itself
- Flexible conduit sections or a service loop in the electrical run near the unit
When all three paths are addressed together, pads do their job. When they are the only intervention, the result is usually disappointment.
Does a Vibration Isolator Under a Ground-Mounted Unit Help or Hurt?
The short answer: It depends on the lineset. Soft isolators under a unit with a rigid lineset can make noise worse. The correct pairing is a rigid, heavy base combined with a flexible lineset loop.
This is the counterintuitive finding that most guides miss entirely. A too-soft mount under a ground-mounted unit creates a flexible link that allows the unit to rock. That rocking pushes energy into the linesets and wiring rather than absorbing it. The unit needs a stable, heavy base. The isolation work belongs at the lineset and conduit connection points - not under the compressor feet.
Effective vibration isolation targets a system natural frequency well below the heat pump’s operating range. Mounts that are too soft cause excessive lateral movement. Mounts that are too stiff pass more energy into the building. Getting that balance right requires knowing the unit’s weight and compressor frequency - not simply buying the thickest pad on the shelf.
The correct configuration for a ground-mounted unit looks like this:
- A heavy, stable concrete pad or compacted gravel base
- Properly rated anti-vibration pads under the unit feet - matched to the unit’s weight spec
- A deliberate loop in the lineset before it enters the wall
- Foam backer or mass-loaded vinyl at the wall penetration
- Flexible sections or a service loop in any rigid conduit run near the unit
What About Minnesota’s Winters?
The short answer: Standard elastomeric mounts crack and harden in sustained sub-zero temperatures. A cold-climate installation in the Twin Cities requires temperature-rated materials and a fall inspection cycle - not just whatever pad came in the truck.
Minnesota winters are not gentle on rubber. Mounts that perform fine in Georgia or even Chicago can become brittle and transmission-prone in a sustained January cold snap. Selecting low-quality elastomeric mounts that crack in cold weather is the most common cold-climate installation mistake. Piping and electrical decoupling is the second most common oversight. Once a mount hardens, it transmits vibration instead of absorbing it. The hum that was not there in October shows up in February, and the connection to the pad is not obvious.
What this means practically for Twin Cities homeowners:
- Ask for the product spec sheet on any isolation material used, not just a verbal assurance. UV- and cold-rated pads designed for HVAC use in northern climates exist. Insist on them.
- Add a pad inspection to your annual maintenance visit. A cracked or compressed pad in October is a quick fix. The same problem discovered in January while the unit is the primary heat source is a longer diagnostic under pressure.
- Check the lineset insulation at the wall penetration each fall. Minnesota’s freeze-thaw cycles stress that sleeve over time. Cracked insulation allows the copper to contact framing directly, and the hum returns even when everything else was done right.
Our team checks all of these details during a heat pump service visit. If you have not had the unit looked at since install, a pre-season call before October is a reasonable step.
What Does Minnesota Code Require for Heat Pump Installation?
The short answer: The Minnesota Mechanical Code requires noise and vibration minimization using manufacturer-specified dampening materials, and a mechanical permit is required before any installation begins.
That permit requirement matters beyond paperwork. A permitted installation gets inspected. An inspector can flag a wall-mounted unit in a location likely to cause structural noise transmission before the homeowner ever hears the hum. A permit trail also protects you at resale and on any manufacturer warranty claims tied to proper installation.
If your heat pump was installed without a permit, or if you are not sure whether one was pulled, our team can review the installation documentation. This question comes up regularly when homeowners buy a house with an existing heat pump and later discover a vibration problem with no service history attached to it.
Can I Fix Heat Pump Vibration Myself, or Do I Need a Pro?
The short answer: Some steps are genuinely DIY-friendly. Others require a licensed technician - especially anything involving the refrigerant lineset, electrical connections, or a unit relocation.
What you can do on your own:
- Replace worn or hardened pads under the unit feet. Measure the unit’s weight first, buy pads rated for that load and for outdoor temperature exposure, and confirm all four corners are making solid, even contact.
- Check the lineset at the wall penetration. If the lines are touching the framing or passing through the hole without any isolation, adding foam backer rod or a rubber grommet at that point is a straightforward fix.
- Check the electrical conduit run near the unit. If rigid conduit is clamped directly to the unit body without any flex section, a conduit body fitting that allows slight movement can help.
What requires a licensed technician:
- Adding a lineset loop. Reforming a refrigerant lineset requires recovering the refrigerant, making new fittings or using pre-flared sections, pressure testing, and recharging. This is not a homeowner task.
- Relocating a wall-mounted unit to a ground pad. That is a full reinstallation - new lineset route, new electrical run, new pad, permit pulled.
- Any diagnostic that involves the refrigerant charge, as low refrigerant can produce sounds that mimic vibration noise.
If you are unsure which path is driving the noise, a diagnostic call gets the answer faster than trial and error on pads. Our team is locally owned and operated in Ramsey. We schedule promptly and show up when we say we will - “Always On Time… Or You Don’t Pay a Dime!(R)“
What Should I Ask My HVAC Installer Before Work Starts?
The short answer: Four specific questions cover the decisions that prevent most vibration problems: mount location, lineset routing, pad material ratings, and conduit handling.
Before work begins on a new installation:
- “Is this a wall mount or a ground pad?” Push for a ground pad whenever the lot allows it.
- “How will the lineset be routed at the wall penetration? Will there be a service loop before the wall entry?” Any experienced installer should be able to answer this without hesitation.
- “What anti-vibration pad material are you using? Is it rated for Minnesota temperatures and UV exposure?” Ask to see the product spec.
- “How is the electrical conduit handled at the unit? Is there a flex section or service loop near the unit body?” Rigid conduit clamped end-to-end is a vibration bridge.
You have every right to ask these questions before signing. A contractor who cannot answer or dismisses them is worth paying attention to. Our post on HVAC contractor red flags in the Twin Cities covers more questions worth asking before you hire anyone for a major installation.
Heat Pump Rebates in Minnesota Right Now
A properly installed, cold-climate heat pump in the Twin Cities qualifies for a meaningful stack of financial incentives. These are not small discounts.
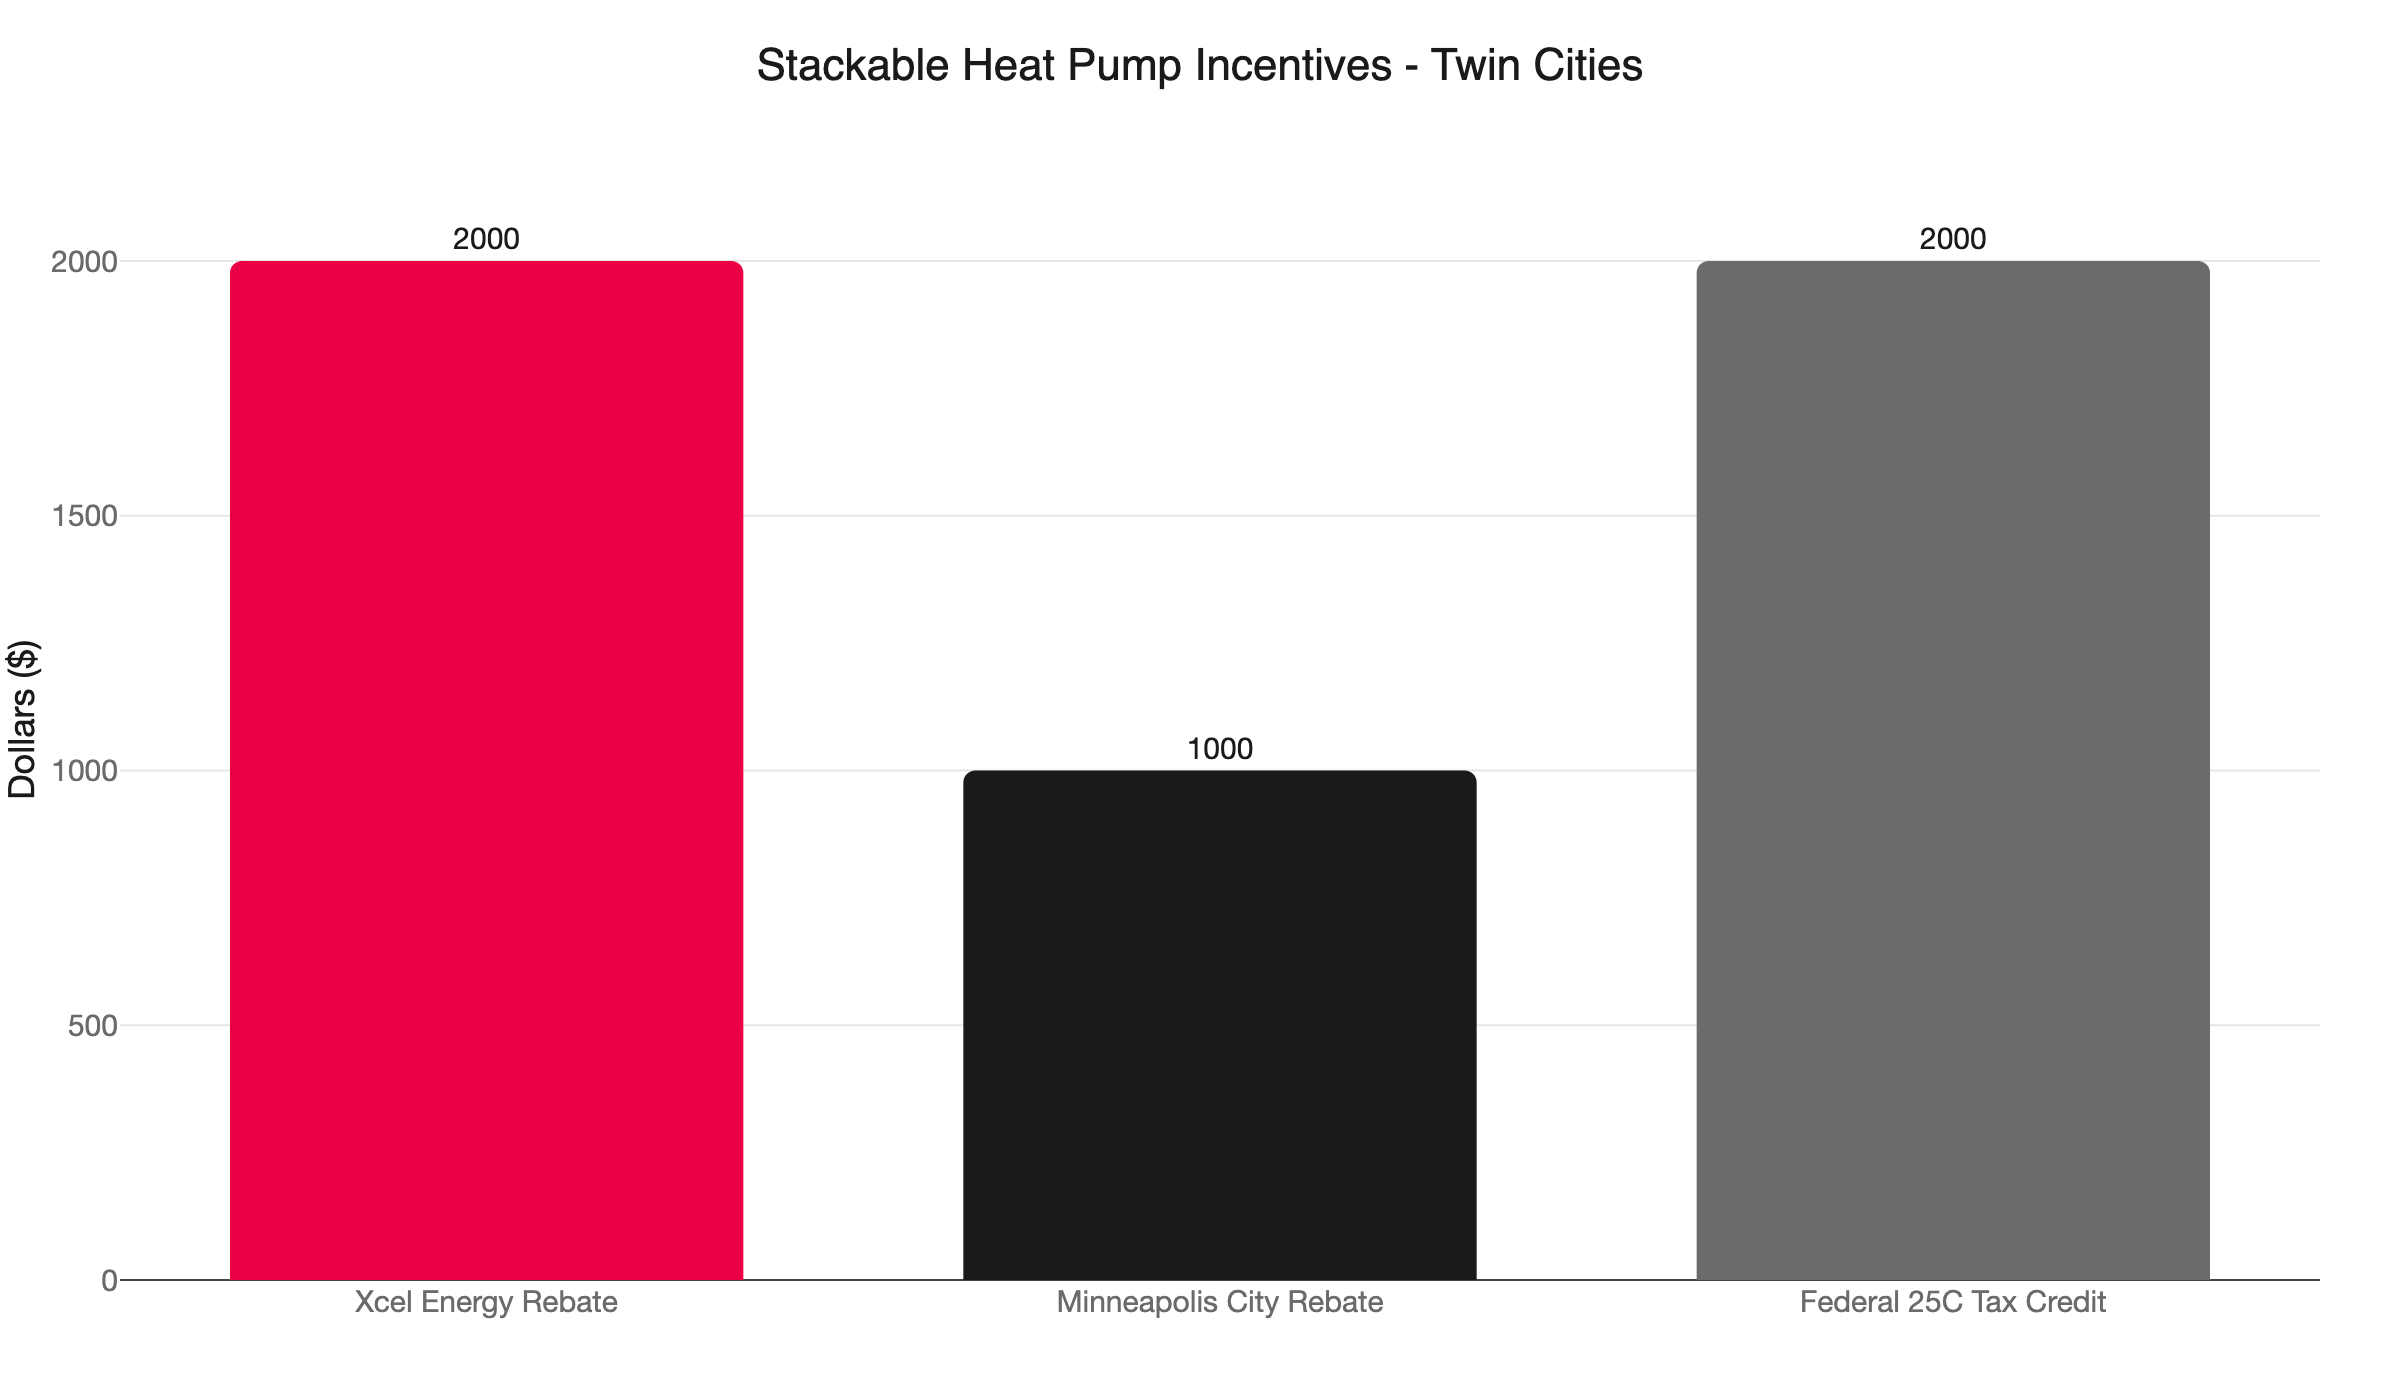
Xcel Energy: Up to $2,000 rebate for cold-climate air source heat pumps with a COP at 5 degrees Fahrenheit of 1.75 or higher, listed on the NEEP cold-climate database. A $600 bonus applies when the install pairs with insulation or air sealing work.
City of Minneapolis: Up to $1,000 city rebate, stackable on top of the Xcel rebate. Residents in designated Green Zones may qualify for up to $5,000 from the city program alone.
Federal 25C tax credit: 30% of project cost, up to $2,000 per year. This is a tax credit, not an upfront rebate. It reduces your federal tax bill at filing.
A qualified Twin Cities homeowner can access up to $5,000 in stacked incentives on a single install. Green Zone Minneapolis residents can reach $7,600 or more when all three programs apply.
A correctly installed heat pump - ground-mounted, with a proper lineset loop, cold-rated pads, and a sealed conduit run - is also the one that runs quietly for years. The rebate stack is a bonus on a job done right.
Our guide to heat pump rebates and tax credits in Minnesota covers the full list of current programs and how to apply. Or call us at (763) 260-6662 to talk through what a new installation looks like for your home. We are locally owned and operated, and we take the on-time promise seriously on every call.
Frequently Asked Questions
Why is my heat pump sending a hum through the walls? +
Will anti-vibration pads under the outdoor unit stop the noise? +
Should my outdoor heat pump unit be wall-mounted or on the ground? +
What heat pump rebates are available in Minnesota right now? +
Need a technician now?