
Mini Split Outdoor Unit Snow, Ice & Winter Care: Minnesota
Key Takeaways
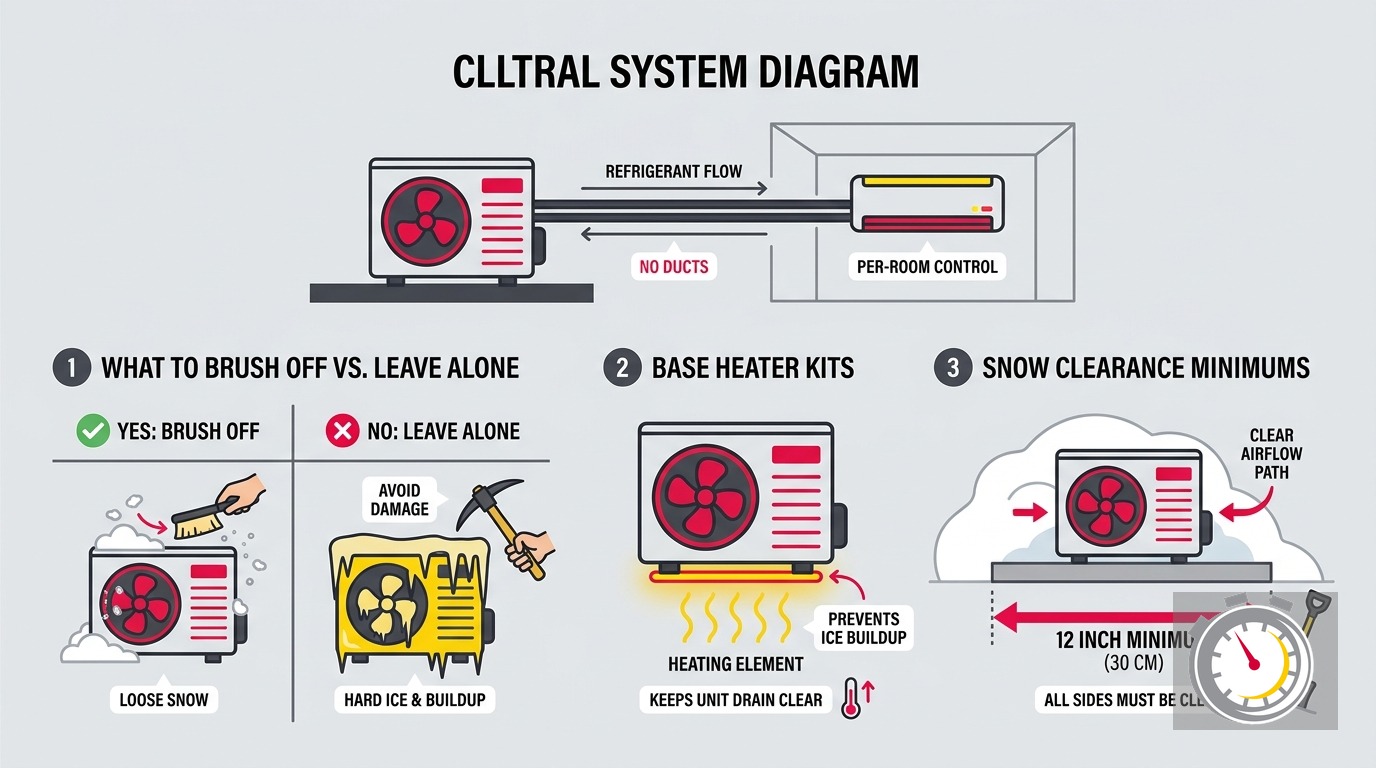
- Brush loose snow off the cabinet top and side grilles. Never use a tool on the coil fins.
- Frost on the outdoor coil during heating is normal. The defrost cycle handles it. Do not touch it.
- A base pan heater is not optional in Minnesota. Without one, refreezing meltwater can shear the fan blade or crack the coil.
- Your outdoor unit needs to sit 36 to 48 inches off the ground in the Twin Cities - not just the 24-inch manufacturer minimum.
- Ask for an OEM base heater kit. It wires into the control board and activates automatically when temperatures drop.
- Cold-climate mini splits are rated to -13°F. Standard models lose useful capacity below 20°F.
- Have a technician energize the crankcase heater 24 hours before the first cold-weather startup of the season.
Mini Split Outdoor Unit Snow, Ice, and Winter: What Minnesota Homeowners Need to Know
A mini split outdoor unit will run through a Minnesota winter. Whether it runs well depends on where it sits, what is installed on the drain pan, and how you respond when snow and ice accumulate on the cabinet.
The standard online advice to elevate the unit, brush off snow, and let defrost mode run is not wrong. It is incomplete. This guide fills in what those articles leave out, including the specific failure chain that destroys fan blades and cracks coils in cold climates, the base pan heater most Minnesota installs skip, and the snow clearance minimums that actually hold up in the Twin Cities.
Can a Mini Split Outdoor Unit Handle a Minnesota Winter?
Yes, with the right unit and a correct installation. Cold-climate mini splits maintain full heating output to -13°F. Standard residential models lose meaningful capacity around 20°F, which Twin Cities winters routinely exceed for days at a time.
NespoloHVAC confirms that standard mini splits lose useful capacity below 20°F, while cold-climate hyper-heat models hold output to -13°F. If you are not sure which type you have, the model number on the outdoor cabinet will tell you. Our technicians can confirm it on a service call.
If you have a standard-efficiency model installed as a supplement to a gas furnace, you are likely fine. The furnace covers the coldest days, and the mini split handles mild-to-moderate shoulder-season heating. If your mini split is your primary heat source, the cold-climate model is not optional in Minnesota.
For homeowners considering a first mini split installation, see our guide to ductless mini splits in older Twin Cities homes. It covers how these systems typically fit the insulation levels and room layouts common in Minnesota housing stock.
What Should You Clear From Your Mini Split Outdoor Unit in Winter?
Clear loose snow from the cabinet top, side intake grilles, and front discharge grille. Leave frost on the outdoor coil fins completely alone. The defrost cycle is automatic. Touching the fins with a tool risks bending the aluminum and cracking the coil - a repair that costs far more than a service call would have.
Here is the full breakdown.
Clear these from your mini split outdoor unit in winter:
- Loose snow sitting on top of the cabinet
- Snow or ice blocking the side intake grilles
- Packed snow against the discharge grille at the top or front of the unit
- Drifted snow closing off the clearance space around all four sides
Use a soft brush or a gloved hand. Work around the cabinet, not across the coil fins. The goal is to keep the airflow path open on all sides so the system can pull heat from the outside air and discharge it properly during defrost cycles.
Leave this completely alone:
- Frost on the outdoor coil fins during heating operation
Pioneer Mini Split and Skylands Energy both confirm that coil frost during heating is a normal part of the refrigerant cycle. The system senses the buildup and runs an automatic defrost sequence. Your role is to keep the clearance space open and let the system finish.
Never use a scraper, a shovel edge, or any tool on the coil fins. The fins are thin aluminum. Bending a small section reduces heat transfer efficiency across the entire coil surface. Cracking the coil is an avoidable and expensive repair.
Should You Cover Your Mini Split Outdoor Unit in Winter?
No. Never cover a mini split outdoor unit for the winter, even in the coldest months. Covering the unit blocks airflow, traps moisture inside the cabinet, and prevents the defrost cycle from running. If the unit needs to operate in heating mode, a cover defeats it entirely.
Mini splits are designed to operate year-round in cold weather. The cabinet is built to handle snow, ice, and sub-zero temperatures without a protective cover. Covering it for the season is a window-air-conditioner habit applied to the wrong appliance.
The one exception is protecting the top of the unit from falling ice or icicles dropping from an overhang above. For that scenario, a purpose-built shelter maintaining at least 48 to 60 inches of vertical clearance above the unit is the right answer. More on that in the clearances section below.
Is the Frost on Your Outdoor Coil Normal?
Yes. Light frost on the outdoor coil fins during heating is a normal part of how a mini split extracts heat from cold air. The system senses the buildup and runs a short defrost cycle automatically. You do not need to do anything.
What a normal defrost cycle looks like from the outside: the outdoor fan may slow or stop briefly, you might hear a low click as the reversing valve shifts, and steam or vapor may rise from the unit as the coil warms and the frost melts. Condensate drips from the base drain. Heating output pauses for a few minutes. Then the fan restarts, the reversing valve clicks back, and the unit returns to heating.
All of that is expected behavior. A defrost cycle typically runs a few minutes and clears on its own.
Solid ice that does not clear within 30 to 60 minutes is not normal. Neither is ice accumulating on the cabinet sides or base between cycles. Those are service calls.
Defrost cycles produce meltwater. That water needs somewhere to go. Where it goes in a Minnesota winter is the source of the most common and most avoidable mini split damage we see in the field.
Why Does the Drain Pan Fail in Minnesota Winters?
The drain pan collects defrost meltwater at the base of the outdoor unit. In Minnesota temperatures, that water refreezes between cycles. Ice builds cycle by cycle until it contacts the spinning fan blade or wedges into the coil from below. Both outcomes mean costly repairs. A base pan heater stops this before it starts.
Here is the full failure sequence.
Meltwater from a defrost cycle pools in the drain pan. Between cycles, outdoor temperatures drop and the water refreezes in the pan. The next defrost cycle adds more water. That refreezes too. Over several days of cold weather, the ice column builds taller with each cycle.
Eventually the ice contacts the spinning fan blade. The blade shears. Or the motor burns out resisting the load. Or the ice column grows upward into the coil fins from below, cracking the coil at its base.
Home Heat Problems documents this failure chain directly. It is consistent with what our technicians find in the field here in the Twin Cities every winter. A condenser fan motor replacement runs $375 to $900. Coil damage is more expensive. The base pan heater that prevents the entire sequence costs a fraction of either repair.
What Happens if You Skip the Base Pan Heater?
Without a base pan heater, you are counting on the drain pan to stay clear between defrost cycles. In a normal Minnesota winter, it will not stay clear. Ice will build cycle by cycle.
Home Heat Problems is direct on this point: a base pan heater is required for any cold climate where freezing weather occurs. It is optional only in frost-free areas or for cooling-only installs. The Twin Cities qualifies as neither.
A base pan heater is an electric strip mounted under the drain pan. It keeps the pan just warm enough so meltwater drains properly between defrost cycles instead of pooling and refreezing. When it is installed and working, the ice column failure chain cannot begin.
If your system was installed without a base pan heater, we can add one. If you are pricing a new installation, insist on it before the job begins. It should not be a line-item upsell on a cold-climate install.
OEM vs. Aftermarket Base Heater Kits: Does It Matter?
Yes. OEM kits wire into the control board and activate automatically when temperatures drop. Aftermarket strips do not integrate with the board, may not match your drain pan geometry, and offer no guarantee of activating at the right threshold for your system.
This distinction does not appear in most online mini split winter guides, and it matters.
An OEM base heater kit wires directly into the unit’s control board. Skylands Energy notes that the board activates the heater automatically when temperatures reach the manufacturer’s preset threshold. You do not manage it manually. It turns on when it needs to be on, without any action on your part.
Aftermarket strip heaters may require a separate thermostat controller to activate. They may not be geometrically compatible with your unit’s drain pan. And they are not calibrated to your system’s specific needs.
When you schedule service, ask specifically for the OEM base heater kit for your unit’s make and model. If that part is unavailable, we will tell you honestly and recommend the best compatible alternative. We will not install something that does not integrate properly and tell you it is the same.
How High Off the Ground Does Your Outdoor Unit Need to Be?
The manufacturer minimum is 24 inches. In the Twin Cities, treat that as a floor, not a target. A single overnight storm can drop 12 or more inches of snow. Drifts against a wall or fence easily double that. Wall-mount brackets at 36 to 48 inches are the practical Minnesota standard.
Pick Comfort’s cold-climate installation notes make the point directly: elevation must clear the local historical maximum snow depth, not just the average. For the Twin Cities, wall-mount brackets positioning the unit at 36 to 48 inches above grade are the correct answer. A ground pad at the 24-inch minimum is not built for Minnesota winters.
A unit buried in an overnight drift has three bad options: work against severely restricted airflow, trip a safety fault and shut down, or run in a degraded state that shortens its service life. None of those is acceptable as a recurring winter condition.
Home Heat Problems adds a related point: the drain pan itself should sit at least 6 inches off any flat surface so the drain holes stay clear of ground ice. That is separate from overall unit elevation. Both matter.
If your unit was installed on a ground pad close to the 24-inch minimum, ask us to assess whether a wall-mount bracket relocation is worth doing. We see snow burial on low-mounted units every single winter. The relocation is far less disruptive than a mid-February service call for a buried and faulted unit.
What Clearances Does the Unit Need on All Four Sides?
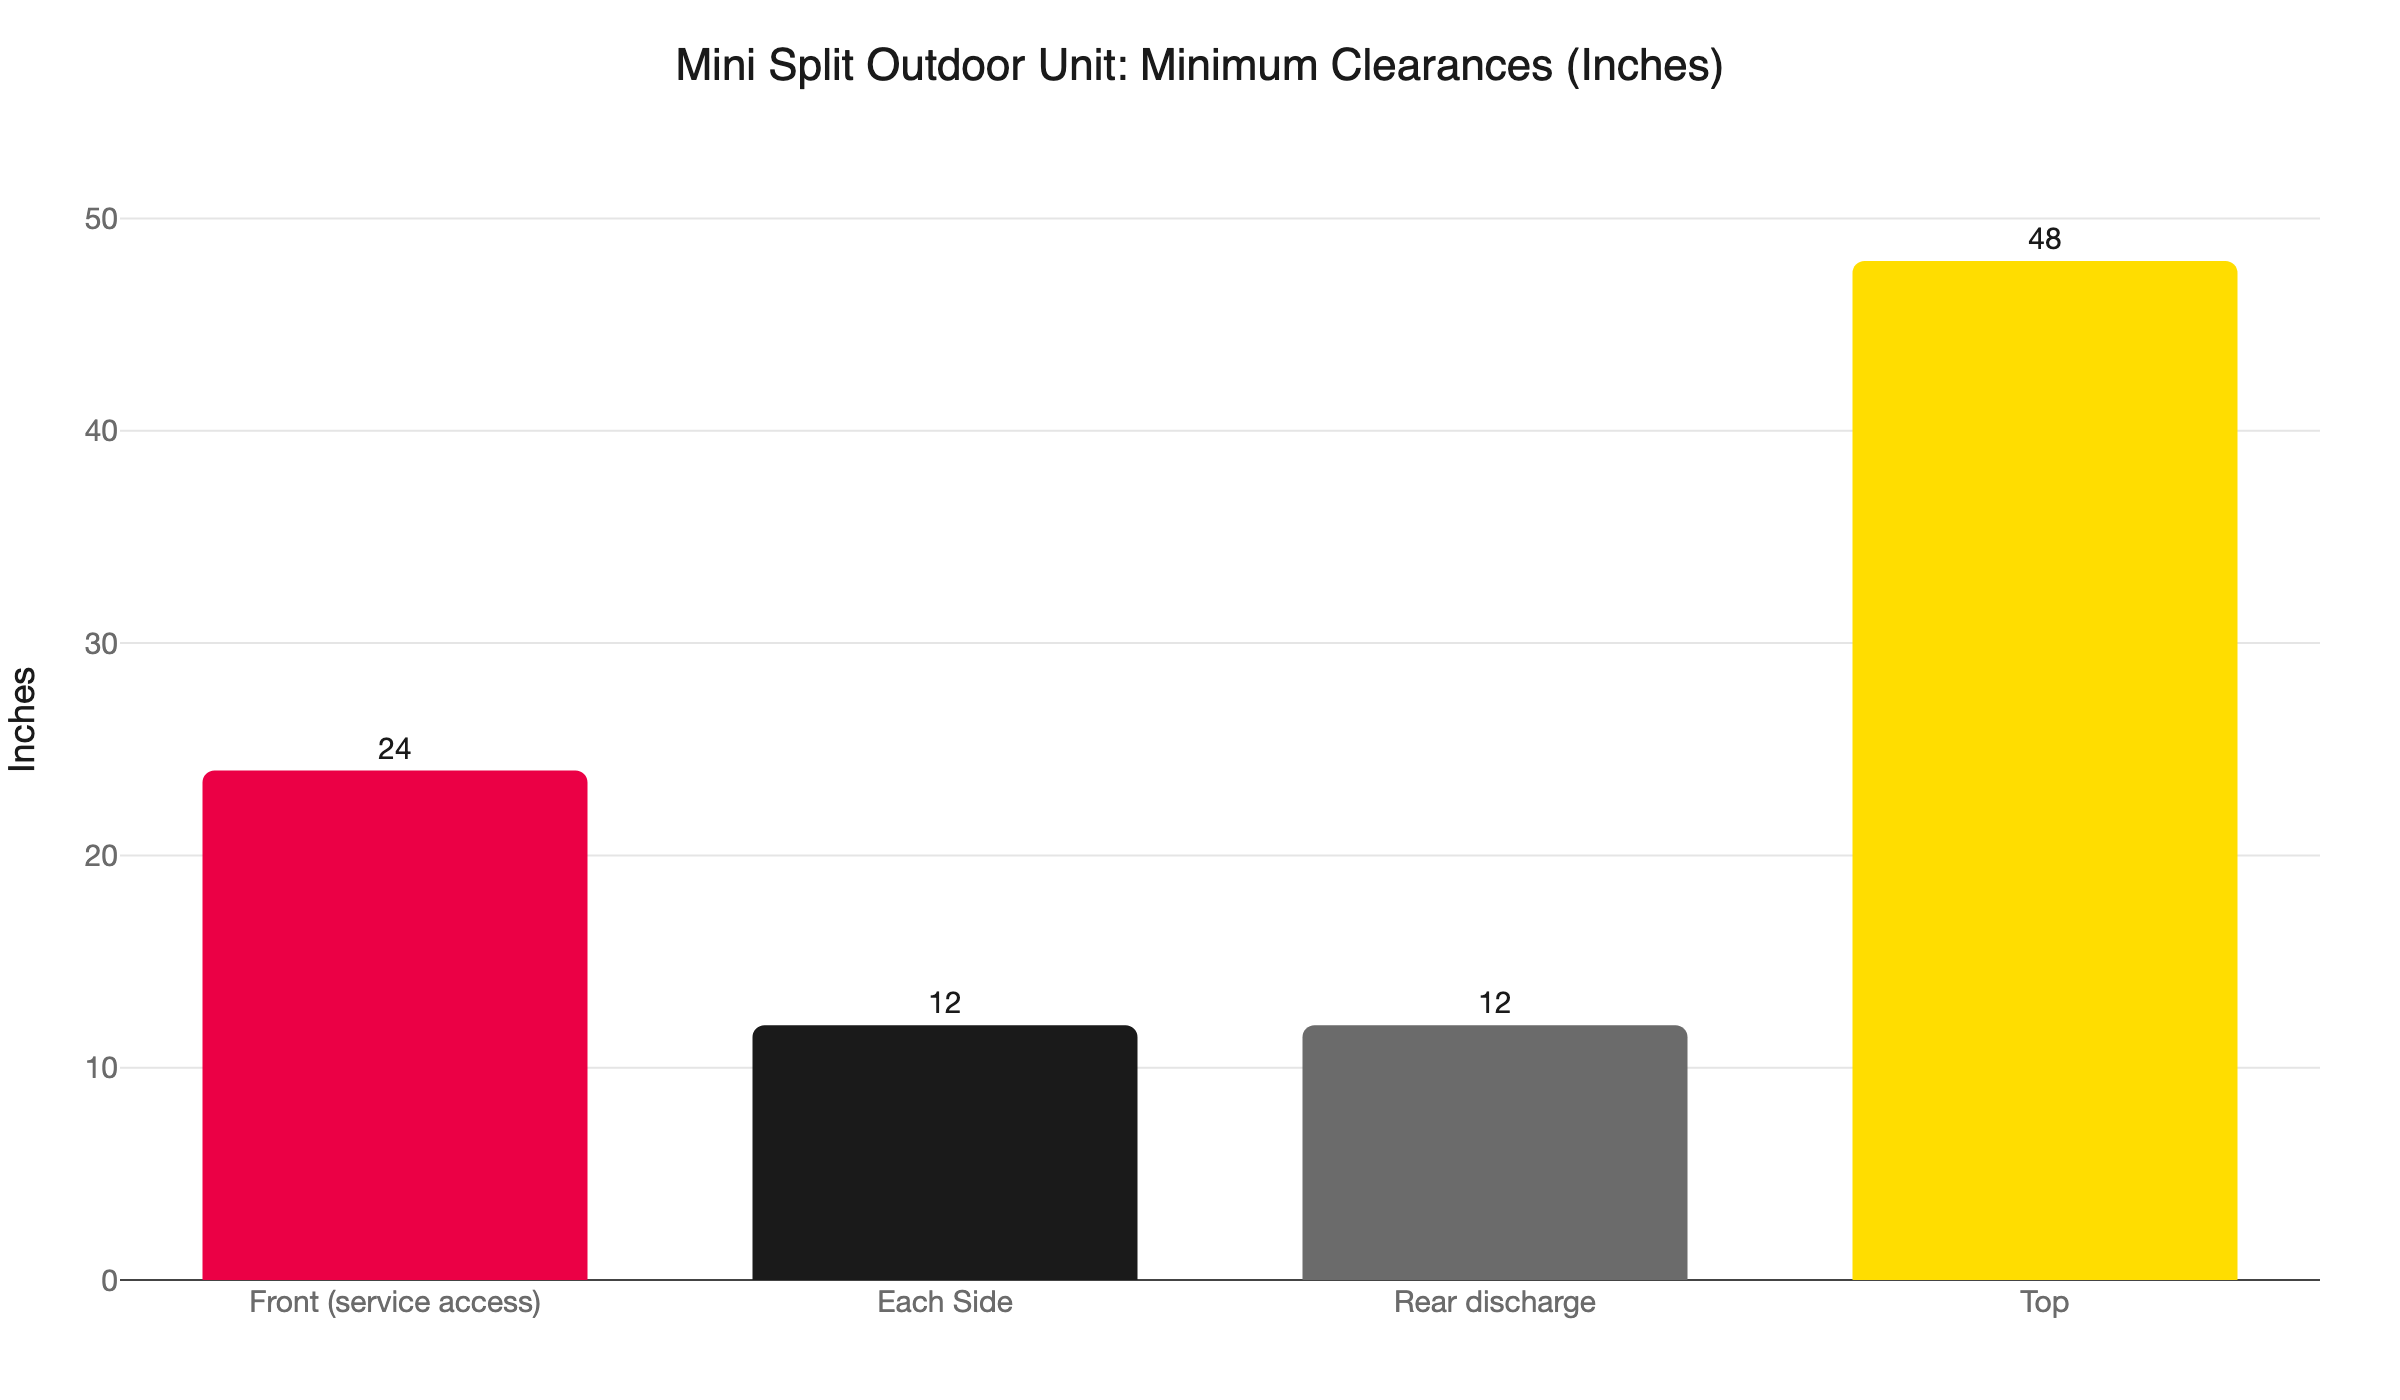
The unit needs 24 to 36 inches at the front, 12 to 24 inches on each side and at the rear, and 48 to 60 inches of unobstructed space above the top discharge. Blocking any of these paths reduces heating output and efficiency. Elevation alone is not enough.
Per Pick Comfort’s clearance guidance, the recommended minimums are:
- Front (service access): 24 to 36 inches
- Each side: 12 to 24 inches
- Rear discharge: 12 to 24 inches
- Top: 48 to 60 inches, unobstructed
The top clearance is the one most commonly violated by well-meaning homeowners. A small shelter built over the unit to protect it from falling snow can be perfectly fine, but only if it maintains at least 48 to 60 inches of open space above the unit’s top discharge. A shelter built too close traps the warm discharge air and creates a condensate icing problem that gets worse with each defrost cycle. Skylands Energy covers this in their winter operation section.
If you have an existing roof overhang that the unit mounts under, that is the ideal arrangement. The overhang keeps snow off the top of the cabinet without restricting the vertical clearance the system needs to breathe.
What Is the Crankcase Heater and Why Does It Matter at Cold-Weather Startup?
The crankcase heater is an electric element wrapped around the compressor housing. It prevents refrigerant from condensing into compressor oil during cold periods when the system is not running. Many manufacturers require it to be energized for 24 hours before the first cold-weather startup of the season.
When a compressor sits cold for an extended period, refrigerant can condense and dissolve into the oil. When the system then starts up, the compressor runs without adequate lubrication. Damage can be severe and immediate.
This step is easy to miss. If the system was installed or last serviced in warm weather and sat unused through October, it may have started up for the first time in November without the crankcase heater properly energized.
If your system went through a cold dormant period before its first winter startup, a technician check is worth scheduling. Our ductless mini split maintenance service includes crankcase heater verification and the full set of pre-winter checks in a single visit.
When to Call Northern One Hour Instead of Handling It Yourself
Some of this is genuinely a homeowner task. Brushing loose snow off the cabinet, keeping intake and discharge grilles clear, and making sure nothing has been stacked against the unit are all yours to manage.
Call us for any of these:
- Solid ice on the coil that does not clear after 30 to 60 minutes in a defrost cycle
- Ice accumulating under the unit and growing upward toward the fan blade
- Heating output has dropped noticeably in cold weather
- Grinding, clicking, or rattling during startup or operation
- The unit is shutting off on fault codes
- You do not know whether your installation included a base pan heater and want to know before the first hard freeze
We are locally owned and operated, serving Ramsey, Blaine, Maple Grove, Plymouth, Brooklyn Park, Minneapolis, St. Paul, and the surrounding Twin Cities metro. When we say “Always On Time… Or You Don’t Pay a Dime!(R),” that is a commitment we stand behind on every call.
Call (763) 260-6662 or book a ductless mini split service visit online.
What Minnesota Rebates Apply to Mini Split Systems?
A qualifying cold-climate mini split is eligible for the federal IRA heat pump tax credit, worth up to $2,000 for Energy Star-certified systems. Xcel Energy and CenterPoint Energy both offer utility rebates on qualifying heat pump installations. Verify current amounts with your utility before purchasing, as figures change.
Genz-Ryan’s Minnesota heat pump overview cites utility rebates in the $500 to $1,000-plus range depending on system efficiency rating. The federal credit and the utility rebate can be stacked on the same installation. For a full breakdown of how to combine them, see our guide to Minnesota heat pump rebates and tax credits.
The rebates make a strong case for upgrading to a cold-climate model if you are still running a standard mini split as a primary heat source. The system you replace it with will perform better in January and cost less after incentives than you might expect.
Frequently Asked Questions
Should I cover my mini split outdoor unit in winter? +
How high should my mini split outdoor unit be off the ground in Minnesota? +
What is a base pan heater and do I need one in Minnesota? +
How do I know if my mini split is defrosting normally? +
Need a technician now?